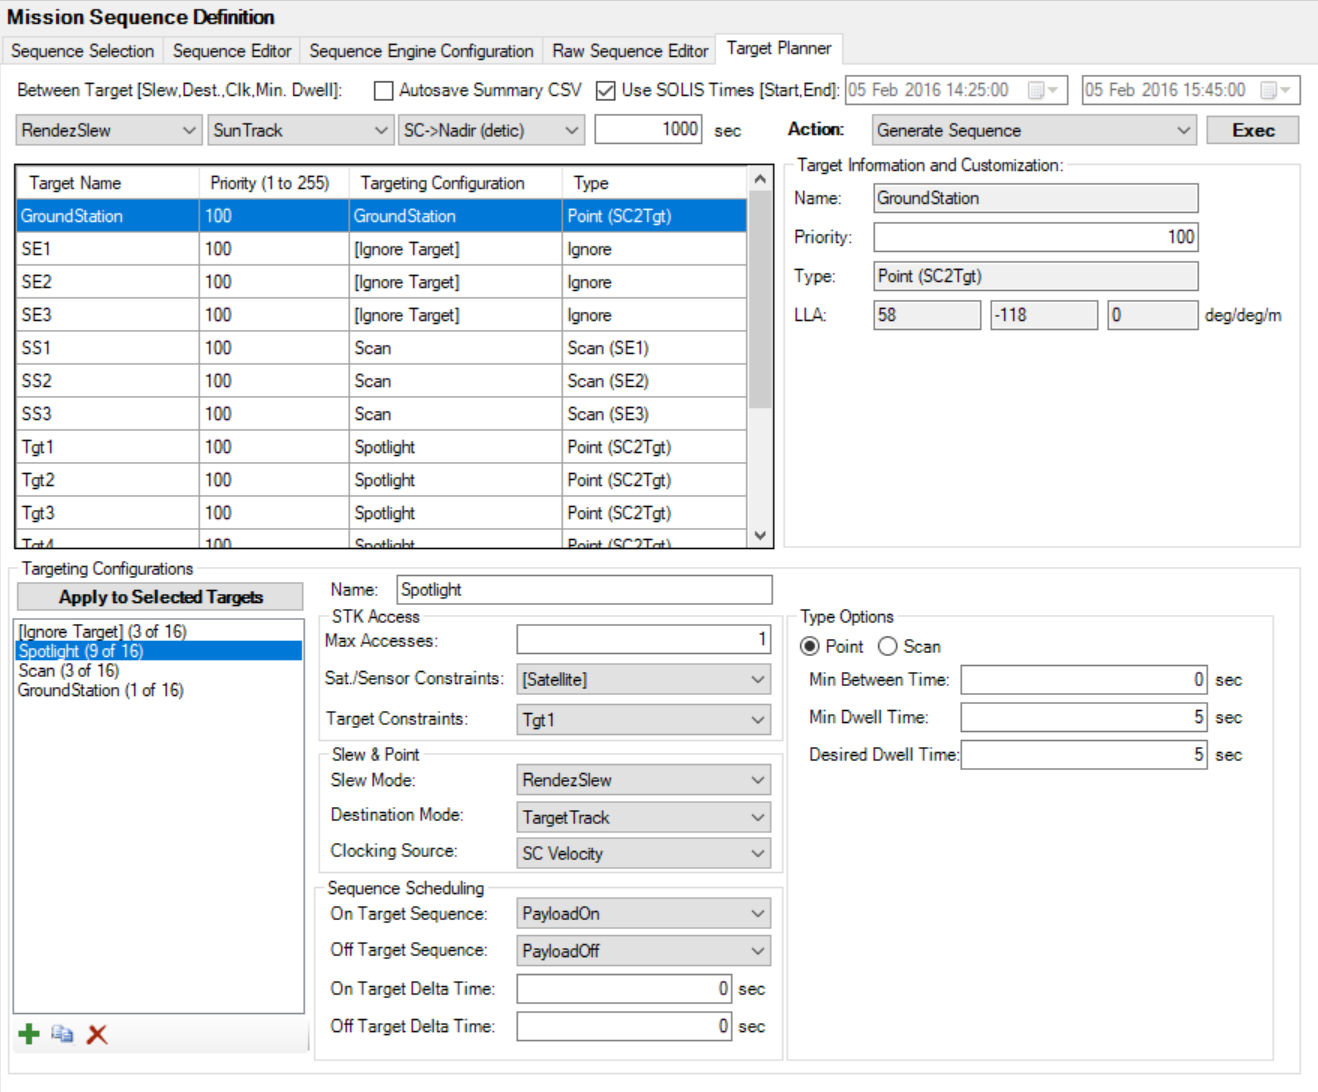
Target Planner
The Target Planner enables you to rapidly generate mission sequences to carry out targeting operations. It incorporates actual spacecraft algorithms and dynamics to determine an optimal targeting plan. The Target Planner is tightly integrated with STK Access to provide various real and accurate target constraints such as temporal, distance, angle, lighting, etc.
Because the Target Planner generates mission sequences and does NOT directly configure spacecraft settings, you have to run the Target Planner for changes to take effect. Alternatively, you can execute all Target Planner features via Automation.
Target Planner Actions

The Target Planner tab lets you execute several actions via the Action dropdown menu:
| Action | Description |
|---|---|
| Generate Sequence | Kicks off the Target Planner. |
| Load STK Target Objects | New Targets created in the STK will only appear in Target Planner if Load STK Target Objects has executed. |
| Load Target Plan From File | Loads targets and targeting configurations from a *.tpc file. |
| Save Target Plan To File | Saves targets and targeting configurations to a *.tpc file. |
C:\Program Files\AGI\STK_ODTK 13\Solis\ExampleFiles\Example_TargetPlannerInput.tpc for an example of a target planner input file syntax.Target Planner setup
Before running the Target Planner, you must complete the following steps:
- Define how the spacecraft should behave Between Targets.
- Review imported targets in the Target List/Target Information and Customization areas.
- Create and apply Targeting Configurations for each target in the Target List.
Between targets

SOLIS enables you to define an attitude configuration when the satellite is between targets. Simply set the following parameters:
| Parameter | Description |
|---|---|
| Slew | Select the slew mode to be used when transitioning to the Between Target Destination. |
| Destination | Select a destination attitude based on the tracking modes in the Mode Controller. |
| Clocking | Select an attitude clocking from one of the provided options. |
| Minimum Dwell Time | Set the minimum amount of time that is required to be at the Between Target Destination. |
Consider the following example conditions
- The minimum dwell time is 30 seconds.
- The current time is 10 seconds.
- The time to slew to the Between Target is 50 seconds.
- The time to slew from the Between Target to the next target is 20 seconds.
- The next target is not available until 100 seconds.
In this case, the target planner would NOT schedule the between target, because there are only 100-20-50-10 = 20 seconds available to dwell at the between target. The target planner will then schedule a slower slew of 100-10 = 90 seconds directly from the previous target to the next target.
In this same example, if the minimum dwell time was set to any number less than 20 seconds, the target planner would schedule the between target and dwell on it for 20 seconds until moving on to the next target.
Autosave Summary CSV
When you select this check box, the target planner summary CSV file is automatically saved to the "tp" directory of your spacecraft. Using Automation, you can override this filename and location.
Target Planner Times
From this area of the Target Planner tab, you can also set a target planner time that is separate from the SOLIS run time. Clear the Use SOLIS Times [Start, End] check box and then change times. The target plan will only be computed within this range of times.
Target List/Target Information and Customization
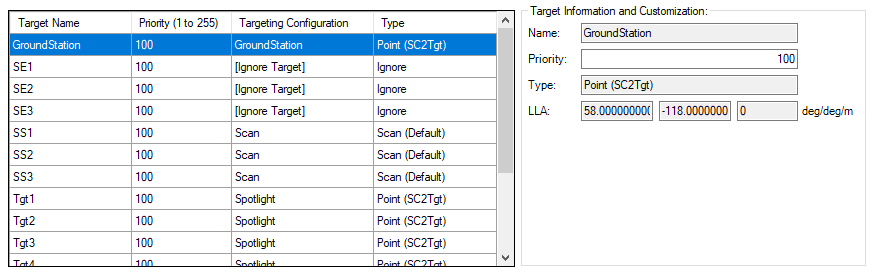
The Target List shows all of the imported targets that have been recognized by SOLIS. Targets are either imported from STK Objects or from a file (for example, a TPC File).
Target Information and Customization
By selecting a specific target in the list, Targeting Information and Customization will be visible to the right of the Target List.
From this area, you can assign a target's Priority.
- Valid priority levels are integers from 1 to 255.
- A 1 represents the higher-priority targets.
- The planner algorithm ensures that higher-priority targets will not be missed as a result of scheduling a lower-priority target.
Targeting Configurations
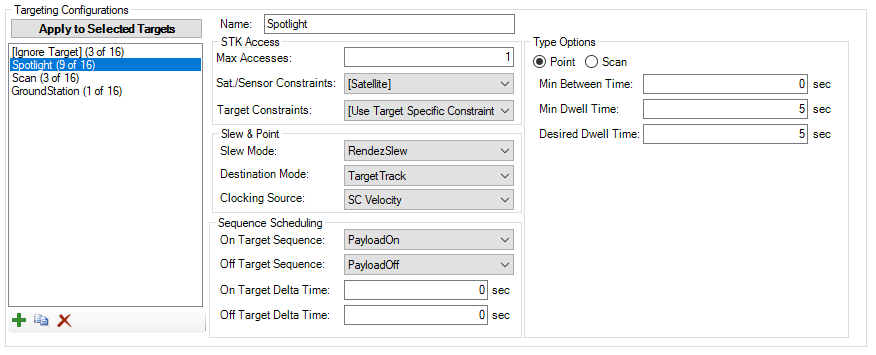
Below the Target List, the Targeting Configurations define how the Target Planner will treat each target. You can apply a targeting configuration to any number of targets. There is also an [Ignore Target] option.
| Button | Description |
|---|---|
 | Add a new targeting configuration. |
 | Copy the selected targeting configuration. |
 | Delete the selected targeting configuration. |
Add a new targeting configuration and then define its parameters to the right. You can set the following parameters for a targeting configuration:
| Parameter | Description |
|---|---|
| Max Accesses | Planner will attempt to schedule a target until it has been accessed this many times. |
| Sat./Sensor Constraints | Defines whether the STK Access constraints are applied from the Satellite -> Target or Sensor -> Target. See the Impose Constraints topic for defining constraints for STK Objects. |
| Target Constraints | Applies STK Access constraints to targets. If a single target is selected, the STK Access constraints of that target are applied to all targets assigned with this targeting configuration. If you select the [Use Target Specific Constraints] option, the STK Access constraints are pulled from the constraints defined for each individual target. |
| Slew Mode | Set the desired slew mode to be used when slewing to the target. |
| Destination Mode | Set the desired mode upon reaching the target, from the list of Tracking (or Hold) modes on the Mode Controller page. |
| Clocking Source | Determines how to clock the spacecraft during targeting. |
| On/Off Target Sequences | Allows execution of other sequences upon arrival/exit of target (Communications, Payloads, etc.). |
| On/Off Target Delta Times | Allows On/Off sequences to be executed at a time delta relative to the arrival/exit time. |
Depending on the type of targeting desired, there are two sets of Type options:
Pointing Options
| Parameter | Description |
|---|---|
| Dwell Time (minimum) | Planner will not consider scheduling a target if there is insufficient time to dwell for this duration. |
| Dwell Time (desired) | Planner will not attempt to dwell over the current target for longer than this time. |
Scanning Options
Each scan has the potential to be scheduled in four different ways
- Start -> Stop
- Stop -> Start
- Start -> Stop w/ Reverse Clocking
- Stop -> Start w/ Reverse Clocking
These parameters define the default options of the scan for any target assigned to this targeting configuration. It is relatively common to override these defaults on a target-by-target basis, as it may not be desired that all scans have the same distance and bearing.
| Parameter | Description |
|---|---|
| Scan Either Direction | If enabled, the target planner will evaluate whether it is best to scan the target from Start -> Stop or from Stop -> Start. If disabled, it will only allow the Start -> Stop direction. |
| Clock Either Direction | If enabled, the target planner will evaluate whether it is best to schedule the clocking "as-defined", or anti-"as-defined". This is useful for "pushbroom" scanners where it is important to have the CCD (Charge-Coupled Device) orthogonal to the scan direction, but forward or backward scanning is OK. |
| Interp Method | The interpolation method determines how the scan interpolates from the start point to the end point. XYZ forms a straight line between the points, LatLonAlt interpolates by Latitude and Longitude forming an arc on the surface of the Central Body, GreatCircle interpolates along the shortest arc between two points on a sphere, and OblateSpheroid interpolates along the shortest arc between two points on an oblate spheroid. |
| Distance | Specify the distance of scan from Target. |
| Bearing | Specify the direction of scan relative to True North or Ground Track. |
| Relative To: | Set the direction of a scan relative to True North or the Satellite Ground Track. |
| Duration | Select Duration to specify the length of time the scan should last. This is used as an alternative to Ground Speed. |
| Ground Speed | Select Ground Speed to specify the ground speed of the scan. Used as an alternative to Duration. |
| Ground Track Speed | In this option, the speed of the scan is equivalent to the speed of the satellite over the ground. |
Overriding the Scan Defaults
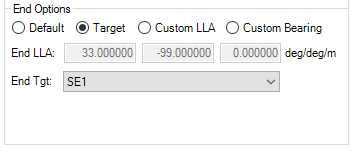
When you select a Scan Target in the Target List, the End Options panel appears to the right. This panel enables you to define a target end point in four different ways.
| Parameter | Description |
|---|---|
| Default | Uses the Scan Settings within the Targeting Configuration to determine the end point of the scan. |
| Target | Uses the position of another target as the end point of the scan. |
| Custom LLA | Specifies a Lat/Lon/Alt as the end point of the scan. |
| Custom Bearing | Species a custom distance and bearing to determine the end point of the scan. |
Running the Target Planner
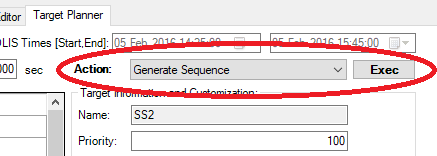
To run the Target Planner, simply click with the Action set to Generate Sequence.
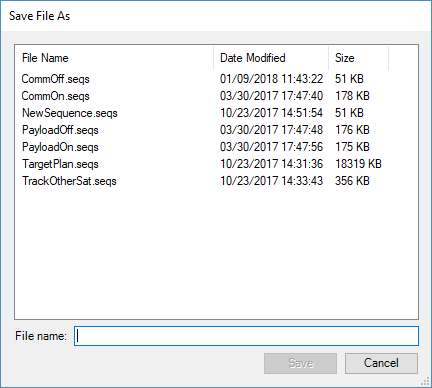
Upon clicking , a dialog box will appear with the option to create a new .seq file or overwrite an existing one.
After saving to a .seq file, a progress window will appear. This widow will show the progress of the Target Planner as it computes a targeting sequence. From this window, you can select options to have the sequence automatically added to the execution list and to show the Target Planner Results Summary window.
Planner results
Executing the Target Planner will generate a spacecraft command sequence to carry out the operations as configured within the interface. The first item in the sequence will be a comment containing a time-based summary of the plan, which appears in the Sequence Editor page or Raw Sequence Editor pages.
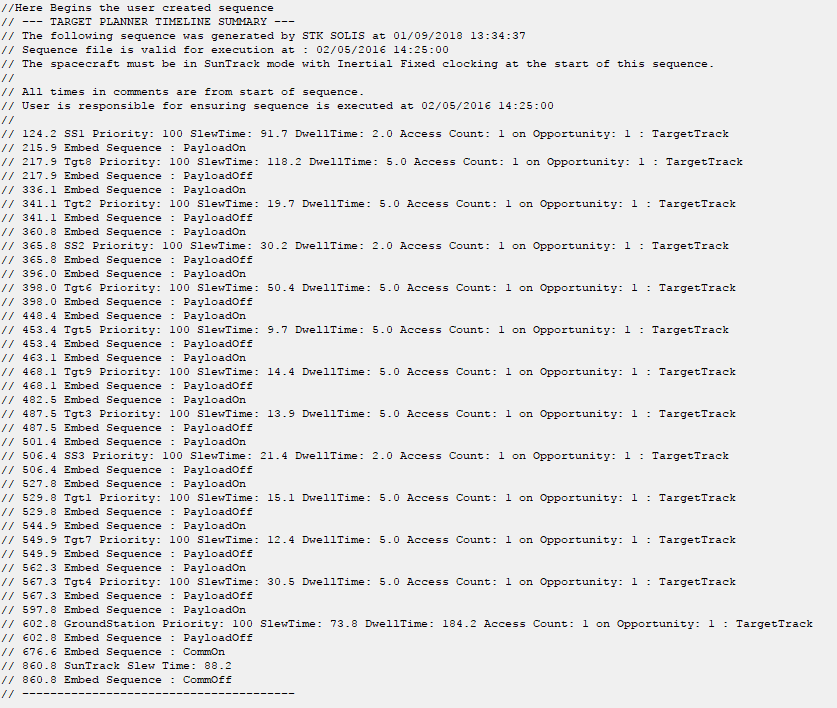
In addition to the time-based summary, there is a a target-based summary available. Columns are sortable for various types of analyses, and you can export the report to a CSV file.
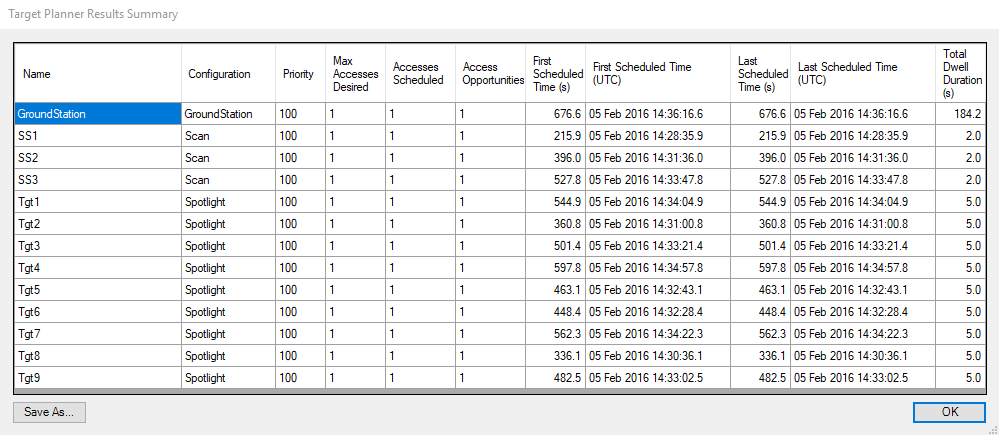
| Column Header | Description |
|---|---|
| Accesses Scheduled | The number of times the target was scheduled in the sequence |
| Access Opportunities | The number of times within the sequence time window that the target met all of the access constraints; target access duration must have been greater than the minimum dwell time |
| First Scheduled Time (s) | Time since sequence start that the target was first scheduled (arrival time, not slew start) |
| First Scheduled Time (UTC) | Date since sequence start that the target was first scheduled (arrival time, not slew start) |
| Last Scheduled Time (s) | Time since sequence start that the target was last scheduled (arrival time, not slew start) |
| Last Scheduled Time (UTC) | Date since sequence start that the target was last scheduled (arrival time, not slew start) |
| Total Dwell Duration (s) | The total amount of time that the target was accessed |
Additional information
Below is a description of the algorithm SOLIS uses to generate a Target Plan. An example scenario about Target Planning is also included with SOLIS.
Algorithm Details
The target planner algorithm selects target order based on minimizing the following cost function:
Cost(target) = EndTimeofAccess(target) - MinimumDwellTime(target) + SlewTime(target)
This technique gives preference to targets with shorter slew times and those with accesses nearing expiration. Targets with insufficient time remaining to slew to and achieve their minimum dwell time are not considered. Targets of lower priority can be scheduled prior to targets of higher priority, as long as their scheduling does not effect the ability to schedule higher priority targets in the future.
Slew Rate Guidelines
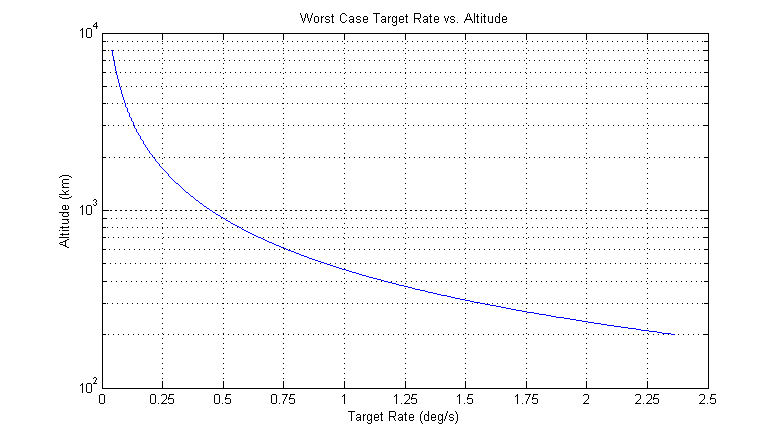
The target planner is generating command sequences to track targets on the central body's surface. Since these targets are moving relative to the spacecraft, the spacecraft configuration must have sufficient agility to track these targets. You can use the Actuator Wizard to rapidly configure the actuators to achieve a desired slew rate.
The chart below shows a worst-case rate of a target given an orbit altitude. The following assumptions are made to create the worst-case scenario:
- The orbit is circular.
- The target lies on the spacecraft ground track.
- The orbit is equatorial.